In this arduino tutorial we will learn how to make an automatic railway crossing barrier using arduino.

Component needed for this tutorial :
- Arduino board
- Servo motor
- Ultrason
- Breadbord and wires
Circuit schematics :
The trig pin of the ultrason will be connected with pin 9 of arduino, and the echo pin will be connected with pin 10 of arduino. the yellew pin of servo_motor will be connected to pin 3.
and the led will be connected to pin 7 of arduino.

What is servo motor? :
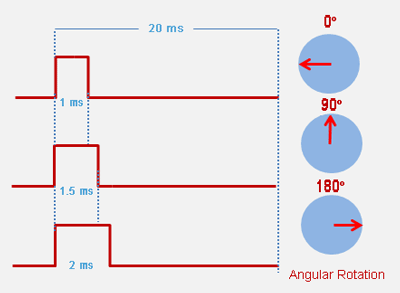
Servo has integrated gears and a shaft that can be precisely controlled. Standard servos allow the shaft that can be positioned at various angles, usually between 0 and 180 degrees. On board other than Mega, use of the library disables analogWrite() (PWM) functionality on pins 9 and 10, whether or not there is a Servo on those pins.

Servo motors have three wires : power, ground, and signal. The power wire is typically black or brown and should be connected to a ground pin on the arduino. The signal pin is typically yellew, orange or white and should be connected to a digital pin on the arduino
What is ultrason? :
it emits an ultrasound at 40 000 Hz which travels through the air and if there is an if there is an object on its path it will bounce back to the module. Considering the travel time and the speed of the sound you can calculate the distance.

The HC-SR04 Ultrasonic module has 4 pins, ground, vcc, trig and echo. The ground and the vcc pins of the module needs to be connected to the ground and the 5 volts pins on the arduino board respectively and the trig and echo pins to any digital pin on the arduino board.

In order to generate the ultrasound you need to set the trig on a high state for 10 microseconds. That will send out an 8 cycle sonic burst which will travel at the speed sound and it will be received in the echo pin. The echo pin will output the time in microseconds the sound wave traveled.
Source code :
Now let's see the arduino sketsh. I include the servo from library, I will use the pins 3,7,9 and 10 and I will name them svpin, redpin , trigpin and echopin. In setup section we need to define them as output except echopin, and I will connect the servo to svpin. In the void loop I will clear the trigpin and sets it on high state for 10 micro seconds, and I will make the echopin in reading status for return the sound wave travel time in microseconds. If the distance is less than or equal 10 the servo_motor will be move 90 degree, else the servo sets in 0.
No comments:
Post a Comment